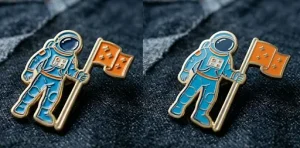
We have produced thousands of custom pins at PatchMakers USA. Some designs come out beautifully right away, while others require a total rebuild before we can even start making the tooling.
A cool design is not necessarily the same as being ready for us to create a production-quality pin. What follows is a complete design guide, covering everything we learned about how to design custom pins from scratch and everything in between (from a blank sheet of paper to a finished product) lying on your desk.
How to Design a Custom Pin (A Quick Answer)
How to design a custom pin with steps:
- Select the pin type: soft enamel vs hard enamel pins.
- Make a vector design file (.AI or .EPS) using the Pantone colors.
- Keep the design simple with 8 colors maximum, no gradients, and 0.2 mm metal lines at least.
- Select the plating and backing types.
- Submit the design to the pin maker and ask for a digital proof before production.
Continue reading below for in-depth steps.
How to Design a Custom Pin in 8 Steps
If you want your artwork to translate perfectly into metal and enamel, follow these custom pin design steps.
Step 1: Define your pin’s purpose
You must define your intent before starting to create a custom pin. For example, is it for retail merchandise? An award? A collectible? Or would it be given away to attendees at the event? Generally, a corporate award pin is a basic design that has a lot of detail (hard enamel) and is usually plated in bright gold for that added touch of elegance.
In contrast, a streetwear brand pin is generally larger than a corporate award pin, uses soft enamel, and uses a combination of high-contrast colors along with plating, such as black nickel. The end use of the pin will dictate what size, type, quantity, and budget you have for the creation of your pin.
Step 2: Choose your pin type
Start by thinking about the pin’s material when picking a design for custom pins. Soft enamel gives texture with visible metal lines. Hard enamel feels smooth, and the colors sit flat. Die-struck is solid metal with no paint at all. Printed versions handle detailed images well. Acrylic works if bright, bold color matters most.
Often chosen for its textured surface, soft enamel stands out through slight ridges between metal lines. Hard enamel is smooth and flat. Because of this smoothness, it resembles premium jewelry more closely. For corporate logos where elegance matters, the hard enamel fits better.
Step 3: Decide on your pin size
The amount of detail mentioned previously in writing regarding pin size is constrained based on size. Typical lapel pin sizes range from approximately 0.75″ to 1.25,” so you have an ample area to include a meaningful design, but too much design will make the pin heavy enough that you can’t use it as part of a lapel, lanyard, etc.
If you are making custom hat pins, the best size range to make your design easy to read would be 1″ to 2″. When considering back patches (major pins used by collectors) or larger than normal collector pins, we could expect these pins to exceed 3″ and contain intricate artwork with a large quantity of text.
Step 4: Sketch your concept
When sketching, remember your final canvas has a tiny space. Designing pins with big lines and clear forms, along with little detail, is what works best! Keep the shading simple, don’t use tiny fonts, and don’t clutter the background! The perfect design for pins is one that can be identified by somebody an arm’s length away. Draw your pin line art using black and white to create the basis for your silhouette before you add color.
Step 5: Digitize your design
Starting with pencil on paper, drawings need to be turned into digital vectors prior to manufacturing. Only after transforming them can they move forward in the process. Software like Adobe Illustrator handles this conversion effectively. Creating the artwork inside such programs ensures precision later. When complete, store the project using .AI, .EPS, or .PDF extensions.
Since the vector format supports scaling endlessly, quality stays intact at any size. Layers stay distinct within the file structure. That separation helps when defining cut lines for molds. Without clear layering, tooling would face complications. So preserving individual elements matters throughout.
Step 6: Choose your colors using the Pantone system
One reason enamel pin makers use PMS (also known as the Pantone Matching System) is that it ensures precise color matching throughout the artwork. With no reliance on CMYK or RGB systems, each section gets its own distinct Pantone shade.
Rather than blending tones digitally, designers assign a single solid code per space. This method skips inconsistencies found in process colors. So while digital models shift between screens, Pantone stays consistent during production.
Too many hues can lead to clutter. Eight shades or fewer keep things more clear. Exceeding that number slows down the production of the item. Complexity rises when color count climbs. Costs go up alongside each added tint.
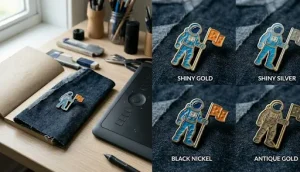
Step 7: Select your plating and finish
The exposed metal on a pin is called the “plating.” The option of different types of plating will greatly affect the look of the pin. There are many choices you can use for plating, including shiny gold, shiny silver, black nickel, antique gold, antique silver, antique copper, rose gold, or even rainbow finish. Just make sure to combine your Pantone color with a metal finish that allows for excellent contrast.
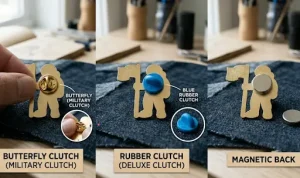
Step 8: Choose your backing
The final functional decision for backing types and which of them will be used to attach the pins. One can use a butterfly clutch (military clutch) or upgrade to a rubber clutch for fashionable everyday use. Magnetic backings are also widely used to protect fine fabric from damage from pinholes or locking clutches to prevent losing expensive collector pins.
Soft Enamel vs Hard Enamel Pins: Which Is Right for Your Design?
The first question we receive from customers just before they place an order is, “What is the difference between soft enamel vs hard enamel pins?” Pin types can look similar when viewed from afar. The manufacturing process is what makes them feel and age differently.
- Manufacturing Difference: Enamel pins are made using a die-struck metal mold. Soft enamel pins have enamel colors dropped into the recessed areas and baked on. A hard enamel pin’s colors are not ‘just’ dropped into the recessed areas. Instead, the colors are overfilled, then baked at a much higher temperature before being polished until the metal and enamel are completely flushed.
- Look and Feel: Soft enamel pins will give the feel of being textured and dimensional, where you will be able to feel the raised ridges of the soft enamel. Hard enamel pins will have no texture, and the surface area will all be flat and smooth, making them appear like high-end jewelry.
- Color Accuracy: Pantone colors for soft enamel pins will usually match exactly. Hard enamel pins will generally require polishing, which may make any warm colors like yellow and orange look slightly muted due to the polishing process.
- Epoxy Coating: Only soft enamel pins can receive an additional paper-thin, round, and glossy clear epoxy dome over their textured surface. The epoxy dome provides a higher level of protection to the soft enamel pins.
| Feature | Soft Enamel | Hard Enamel |
| Texture | Raised metal ridges, recessed color | Flat, smooth, jewelry-like |
| Durability | High, but color can eventually scratch | Extremely high, scratch-resistant |
| Cost | More affordable | Premium pricing |
| Best For | Merch, art pins, intricate details | Corporate logos, awards, premium gifts |
Pins (What Our Production Team Checks)
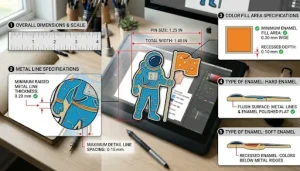
Before any mold is cut, our factory team reviews your design file against strict physical limitations. Metal and liquid enamel obey the laws of physics. If your file breaks these custom pin file requirements, it will fail on the production line.
- Rule 1: No gradients or shading. Enamel is a liquid pigment that fills a die-struck recess. It cannot blend between cells. Every color must be a solid, flat Pantone hue. If your design relies on gradients, you need a printed pin, not an enamel one.
- Rule 2: Each color must be separated by a metal line. Because enamel is liquid during the filling process, two colors placed side-by-side without a metal wall between them will bleed into each other.
- Rule 3: Minimum metal line thickness. To create the walls that hold the enamel, the metal lines in your design must be at least 0.2 mm thick for soft enamel and 0.15 mm thick for hard enamel.
- Rule 4: Minimum color fill area. The recessed areas receiving the liquid enamel must be at least 0.3mm wide. Any area smaller than this size cannot physically hold color and will have to be rendered as solid raised metal.
- Rule 5: Text in a minimum 5 pt font. Typography smaller than 5pt will not register clearly in the mold. The letters will fill in and become illegible metal blobs.
- Rule 6: A maximum of 8 colors is recommended. While technically possible to use more, keeping your design to 8 colors or fewer ensures structural integrity and keeps costs down.
- Rule 7: Outer edge must be metal. Enamel cannot form a self-supporting outer edge. The entire perimeter of your pin must be closed off by a metal border.
What File Format Do You Need for Custom Pin Designs?
The number one reason for production delays is poor file formatting. We regularly receive low-resolution .JPG files with gradients and fine text at 2pt. So, what file format for enamel pins are correct?
Vector vs. Raster
Pin molds are cut using CNC machinery guided by mathematical paths, not pixels. This means raster images (.JPG, .PNG) are virtually useless for manufacturing. If you submit a raster image, our team has to manually trace and redraw it. You must provide a vector file.
Accepted Formats
- .AI (Adobe Illustrator): The gold standard. This gives us full control over layers, paths, and Pantone assignments.
- .EPS: A highly stable vector format that works across multiple design software platforms.
- .PDF: Acceptable, provided the PDF was saved directly from a vector program and the editing capabilities were preserved.
Pantone Colors Exclusively
CMYK is for paper printers. RGB is for screens. Enamel paints are mixed using the Pantone Matching System (PMS). You must assign solid coated Pantone colors to your vector paths. If you do not have vector art or don’t know how to convert your CMYK logo to PMS, you can utilize our vector conversion services to ensure your file is factory-ready.
Best Color Schemes for Custom Pins: What Works and What Fails
Understanding brand color theory is helpful, but understanding how colors physically react in metal is crucial. Because enamel colors differ from screen colors, physical Pantone swatch books are essential for exact matching. This helps with choosing the best lapel pin color schemes.
High Contrast Pairings
The most impactful pins rely on stark contrast. Pairing black nickel plating with bright, saturated fill colors (like cyan, neon pink, or lime green) creates maximum visual impact. The dark metal lines make the colors pop off the lapel pins.
Special Effect Pins
The UV-reactive pins show colors when you take them outside in the sunlight. The thermochromic pins change color when you touch them, due to their heat sensitivity. The UV-reactive and thermochromic pins are really popular and have high retail values.
Gold Plating + Warm Tones
When you are using shiny gold or antique gold plating, you should pair it with deep reds, navy blues, and forest greens. They are the classic color scheme for military, academic, and corporate recognition pins.
Colors That Don’t Translate Well
- Pure White: White enamel appears sometimes to be slightly gray or reflects the surrounding plating tone, mostly when used in hard enamel.
- Pastels in Hard Enamel: Heavy polishing is important for hard enamel and can fade out very light pastel tones.
- Gradients: Color gradients are not possible in traditional enamel pins.
Other options that work well and you should definitely check out are transparent stained-glass pins for sophistication and eco-friendly pins for people who want to go green for the planet.
Plating Options for Custom Pins: Gold, Silver, Black Nickel & More
Enamel pin plating options are not just an afterthought. They are the skeleton of your design. The metal you choose will outline every single color block in your artwork.
| Shiny Gold | A classic luxury option for corporate awards, anniversaries, and high-end merch. |
| Shiny Silver | Modern, clean, and versatile design for tech brands, sports teams, and professional-level associations. |
| Black Nickel | Bold and high-contrast dark gunmetal. Great for streetwear, fashion brands, and pop-culture artistic pins. |
| Antique Finishes (Gold, Silver, Copper) | Darkened metal with polished raised surfaces and dark recessed areas. Best for vintage, heritage, military coins, and biker club custom lapel pins. |
| Rose Gold | Trendy for females. Used by beauty, lifestyle, and boutique fashion brands. |
| Rainbow Plating | Anodized metal with shifting color spectrum. It is best for festival merch and LGBTQ+ Pride pins. |
Choosing the Right Pin Backing
Buyers often overlook the enamel pin backing types, but it dictates the user experience of your product.
| Pin Backing Types | Description |
| Butterfly Clutch (Military Clutch) | Standard, secure, and reliable two small metal prongs with a squeeze to release. |
| Rubber Clutch (Deluxe Clutch) | Soft-grip PVC cap. Best for casual wear and does not scratch skin. |
| Magnetic Back | Strong magnet with no piercing. Premium feel and safe for delicate fabrics, leather jackets, or expensive suits. |
| Safety Pin Back | A horizontal clasp mechanism. Best for larger pins, budget event handouts, or traditional brooches. |
| Locking Clutch | Maximum security. Uses a mechanism or small wrench to remove. For high-value pins worn at crowded events. |
Making Your Custom Pin Retail-Ready with Packaging Options
If you plan to sell your pins, for example, selling custom baseball pins to your local baseball teams. Handing a customer a loose piece of metal in a standard zip-lock is not going to command a premium price. Rather, go for an enamel pin packaging backer card.
| Packaging Options | Description |
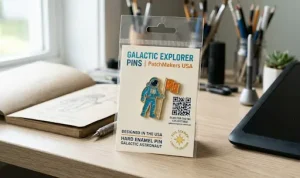
| Backer Cards | Retail standard custom heavy cardstock printed, hole-punched, and pinned. You can add branding, pricing, and QR codes. |
| Cello Bags | A clear poly bag protects the pin and backer card during transit and handling. |
| Display Packs | Reinforced hanghole (at top) bags for retail shelving or convention pegboards. |
| Jewelry Boxes and Velvet Pouches | Best for high-end corporate awards, commemorative pins, or premium gifts. |
Frequently Asked Questions
[faq_accordion]
Ready to Turn Your Design into Real Custom Pins?
Once you finish reading our blog post on how to design custom pins, you will be ready to have your own custom pin made according to your design.
Patch Makers USA can create all types of custom pins in bulk, and we offer custom enamel pin no minimum order quantity. Thousands of satisfied customers and years of excellence have enhanced our expertise. Our expert team will send you digital mockups at no extra cost so that you can verify that your file meets all of the manufacturing requirements prior to production.
Submit your custom pin design today to receive a digital proof and quote in less than 24 hours.