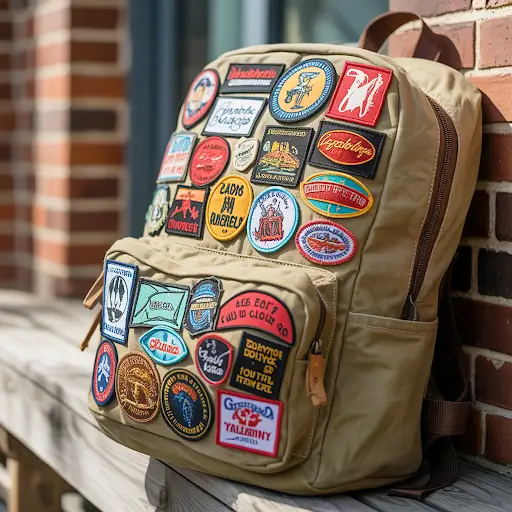
A plain backpack gets the job done. Patches on a backpack turn it into a story. Whether you are a brand handing out swag bags at a conference, a school creating custom scout or team backpacks, or a small business building a tight merch line, learning how to put patches on backpack surfaces the right way is a skill worth having.
Done well, those little patches become mobile billboards for your logo, your message, and your vibe. In this guide, we will walk through exactly how to add patches to backpacks using iron on, sewing, Velcro and adhesive methods, with tips for different fabrics and use cases.
Know Your Backpack Before You Touch a Patch
Before you search “how to put a patch on a backpack” and fire up the iron, pause for a second and check three things:
1. Fabric Type
Different fabrics can handle different kinds of heat, glue, and stitching.
Common backpack materials:
- Canvas and cotton
Best material for backpack patches. They handle iron on patches on backpack fabrics very well, can be sewn easily, and work with most adhesives. - Polyester and nylon
Very common in school and travel bags. They can melt if you misuse heat, so “how to iron on patch to backpack” here needs extra caution. - Leather or faux leather
Great for a leather patch backpack look, but no direct hot iron. For patches on leather bag designs, you are usually better with sewing or strong adhesive.
If you are a brand ordering custom name patches for bags, always match patch backing to fabric. That is where a pro custom patch factory like Patch Makers USA pays off.
2. Patch Type and Backing
You might be working with:
- Iron on patches
- Sew on patches
- Velcro patches for backpacks (hook and loop)
- Self adhesive patches for backpacks
Each one changes how you attach patches to backpack surfaces and how long they last. For promotional backpacks, corporate swag, custom scout patches bulk, or custom team patches for sports uniforms, consistent backing equals consistent results.
3. Placement and Purpose
Ask yourself:
- Is this a name patch for backpack on the front pocket?
- A backpack name patch for kids and staff?
- A big custom patch backpack design for branding at festivals and events?
Decide if you want subtle branding or loud “you cannot miss this” energy. That will guide size and location when you start attaching patches to backpack panels.
Plan Your Layout Like a Designer
Before you sew or iron anything, lay your patches on the bag. Treat the surface like a small billboard.
Good spots for patches on backpacks:
- Top front panel for your main logo patch
- Front pocket for name patches or club patches
- Side pockets for mini patches or flags
- Straps for thin, long patches like custom employee name patches for workwear
For brands ordering custom patches for small businesses or corporate logo patches USA made, keep these layout tips in mind:
- Create a visual triangle. Place your main logo patch high, then two supporting patches lower left and lower right.
- Do not overload one area. A cluttered front panel makes your logo patch size hard to read.
- Leave room for growth. You might add more patches later from events, campaigns or collabs.
When your layout feels right, snap a quick photo. That becomes your reference once you start sewing or ironing patches on backpack fabric.
How to Iron On Patches on Backpack Fabric
If you are working with iron on patches backpack style, here is a step by step that actually works in real life.
A. Can You Iron on a Patch to a Backpack?
Yes, but:
- Canvas and cotton backpacks are ideal.
- Polyester and nylon are risky with direct heat.
- For waterproof bags, you might damage coatings.
If you are unsure, test on a small inside area first.
B. How to Iron on a Patch to a Backpack
- Preheat your iron
Medium to high heat, no steam. For polyester or nylon, stay on the lower side. - Place the backpack on a flat, heat safe surface
Put a towel inside the bag under the area where the patch will go. This gives you resistance and protects the other side. - Position the patch
Place the patch where you want it. For a clean look, make sure it is straight and centered. - Cover with a pressing cloth
Use a thin cotton cloth or parchment paper on top so you do not scorch the thread or fabric. - Press, do not slide
Hold the iron firmly on the patch area for 15 to 30 seconds. Do not move the iron around. That can shift the patch. - Flip and repeat
If possible, turn the backpack inside out and press again from the back for another 10 to 15 seconds. - Let it cool completely
Do not tug on the patch while warm. Wait until it is fully cool to check adhesion.
If something goes crooked or you need to remove old iron on patches from backpacks before adding new ones, you can follow Patch Makers USA’s detailed guide here: How to Remove Iron-On Letters & Patches: A Step-by-Step Guide. That resource is helpful for schools, camps, and brands that regularly rebrand or switch sponsors on gear.
How to Sew a Patch on a Backpack
If you care about durability, “how to sew a patch on a backpack” is your best friend. Sewn patches survive the gym locker, the luggage carousel, and the daily commute.
A. Hand Sewing Patches on Backpack
You will need:
- Heavy duty needle
- Strong thread matching the patch border
- Small scissors or snips
- Pins or fabric tape
Steps:
- Place and pin the patch
Put the patch on the bag where you want it and secure it with pins or a tiny bit of washable fabric tape. - Thread and knot your needle
Double the thread for strength if the backpack is thick. - Start from inside the bag
Push the needle from inside to outside so the knot hides inside the backpack. - Use a small overcast or whip stitch
Stitch around the edge of the patch with even spacing. This is what people mean when they talk about “slipstitch” or sewing a patch on a backpack by hand. - Tie off securely inside
Once you go all the way around, knot the thread on the inside and trim the excess.
This method works great for sew on patches for backpacks, custom embroidery patch designs, backpack name patch styles, and patches on leather jacket style bags when heat is not an option.
B. Machine Sewing Patches on Backpack
If you are outfitting staff, teams, or bulk branded backpacks for events, a sewing machine speeds things up.
- Use a zigzag or straight stitch close to the patch edge.
- Go slow over seams or thick areas.
- Keep straps and pockets out of the way so you do not accidentally stitch them shut.
This is a solid option for businesses that need bulk custom patches for uniforms and want to keep backpacks consistent across locations.
How to Put Velcro Patches on a Backpack
Velcro patches are perfect for backpack patches and pins that you want to swap out by theme, event, or mood. They are also very popular for tactical and military style bags.
You have two tasks:
- Add loop panel to the backpack
- Use hook backed patches
Adding Velcro to Backpack
If your bag does not already have a Velcro panel:
- Cut a piece of loop (soft) Velcro in the size you want.
- Either sew it on or use a strong fabric adhesive designed for outdoor gear.
- Place it somewhere flat like the front panel, not across seams.
Then you can attach any hook backed custom patches Velcro style, including custom military patches USA, morale patches, or corporate logo patches USA made that you rotate per campaign.
This is a smart move for businesses that run seasonal promotions, holiday campaigns (custom patches for Christmas, Easter, or thanksgiving), or frequent partnerships. You keep one backpack, change only the patch.
Glue, Adhesive and Stick On Patches for Backpacks
If you hate sewing and do not want to risk heat, adhesive can help. Just set expectations. Glue is best for low stress areas or short term projects.
Best Glue for Patches on Backpack
Look for:
- Fabric glue that dries flexible
- Industrial strength clear adhesives for outdoor gear
- Glue that says it works on nylon, polyester, or canvas
How to apply patch to backpack with glue:
- Clean the area and let it dry.
- Apply glue in a thin, even layer on the back of the patch.
- Press firmly onto the bag and hold, or weigh it down.
- Let it cure fully, often 24 hours.
There are also stick on patches for backpacks and self adhesive patches for backpacks that work like giant stickers. These are handy for conferences, kids’ bookbags, or temporary branding where you only need the look for a short period. For long term use though, sewing or Velcro will beat glue every time.
Nylon, Leather, Kids Packs and Other Tricky Cases
Not all bags behave the same way. Here is how to add patches to backpack materials that can be fussy.
Nylon and Polyester Backpacks
The big questions:
- Can you iron patches on polyester backpack material?
Yes, but only at low heat, always with a pressing cloth, and only if the manufacturer label allows ironing. - For “how to put patches on nylon backpack” safely, consider:
- Sew on patches
- Velcro panels
- Specialist adhesives tested on synthetic gear
Leather and Faux Leather Bags
For patches on leather bag styles, heat can scorch or bubble the finish. Better options:
- Sew on patches carefully with a leather needle.
- Use high quality leather adhesive.
If you are creating premium merch like a coach backpack patches style or leather patch backpack line for your brand, choose Custom Leather Patches from Patch Makers USA and have them sewn by a pro manufacturer or local shop.
Kids’ Backpacks and School Bags
Parents often ask how to attach scout badges without sewing or how to put patches on bag surfaces that will be tossed, dragged, and slammed into lockers.
For kids:
- Use a mix of iron on plus a few reinforcing stitches.
- Consider name patches for backpacks to avoid mix ups.
- Avoid sharp pins on younger children’s bags.
Read this for more info: Safe & Fun, Custom Patches for Kids’ Clothing and School Bags
Turning Backpack Patches into Brand Strategy
If you are a brand owner, marketer, or school admin, patches on backpack designs are not just decoration. They are mobile branding.
Use custom patch backpack programs to:
- Create limited edition backpack patches and pins for events and festivals.
- Reward loyalty with Unique Patches for VIP customers or staff.
- Offer custom clothing patches and backpack patches in your merch store.
- Build recognition at trade shows with custom logo patches for bags and team backpacks.
Patch Makers USA can help you buy custom patches online, design your own patch and order, and deliver fast turnaround custom patches USA wide. Whether you need custom patch maker in California, Texas, or Florida, you get custom patches made in America with consistent quality.
If you are not sure which patch style works best for the fabric of your bags, check out their fabric focused content such as their patch fit and fabric guides on the site. It will help you match Custom Embroidered Patches, Custom PVC Patches, or Custom Woven Patches to canvas, nylon, or leather backpacks before you order in bulk.
FAQs
Can you put patches on backpacks without sewing or ironing?
Yes. You can use stick on patches for backpacks, strong fabric glue, or Velcro panels. Just remember that no sew, no iron methods are usually less durable than sewn on patches, especially on high traffic spots.
What is the best material for backpack patches?
For longevity, high quality embroidered patches made in USA on twill or canvas backing are excellent. For outdoor or tactical bags, Custom PVC Patches work very
Can I cover a logo on backpack with a patch?
Yes. This is one of the most common uses. Choose a patch slightly bigger than the logo area and either iron on or sew it. Brands often do this when repurposing leftover stock or co branding bags.
Ready To Turn Your Backpacks Into Branded Storytellers?
Whether you are outfitting a school club, a touring band, a small business, or a national brand, patches on backpack designs are one of the smartest ways to keep your logo moving through airports, campuses and city streets.
If you need a custom patch, need bulk patches, or want to launch a full custom patch backpack program for your brand, let the USA’s best patch company handle the heavy lifting.
Get your custom patches from Patch Makers USA, then use this guide to attach them like a pro and turn every backpack into a walking ad for your story.